

How To Hide Overflow Text In Excel
Text overflow can suspension the advent of a spreadsheet as it might wait awkward with alluvion texts coming out of a cell. If y'all have a spreadsheet with this problem, you can fix the text-overflow issue in Microsoft Excel so that it looks better and clean.
What is text overflow in Microsoft Excel
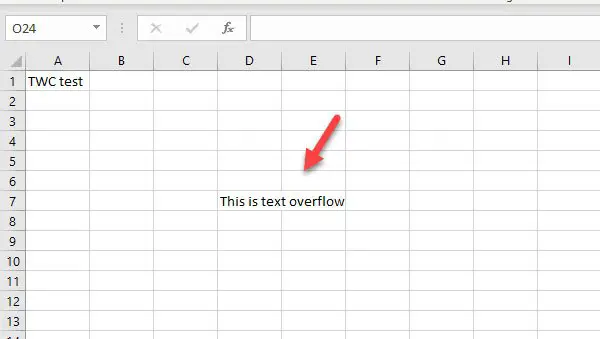
As the proper noun defines, if the text is going outside of a cell, it is called text-overflow. The default width of a cell might non always be complying with the width of the whole text. The default width of an Excel cell is viii.43mm, which is minimal, and most of the people frequently go problems. At such a moment, the text gets hidden by the right-side cell, and it is not accessible for reading once you are done with the editing.
Whichever version of Microsoft Office you are using, you lot tin can get the aforementioned issue in every Excel spreadsheet. Likewise, information technology happens with Excel Online too. There are several ways to deal with this issue. However, you should know that every method lets you increment the width of the whole cavalcade at one time. If at that place are ten cells in a column and y'all try to increase the width of the first cell, the same will exist practical on the whole column – non just one cell.
How to stop or hide Text Overflow in Excel
To fix the text-overflow problem in Microsoft Excel, follow these suggestions-
- Manually increment the width of a column
- Use the AutoFit Cavalcade Width option
- Change the default width of a cell
To know the steps in particular, go on reading.
1] Manually increase the width of a column

Information technology is probably the easiest way to get rid of this problem. Although it is an onetime-school method, information technology works perfectly. No affair if the width of a cell should be 10mm or 100mm, yous tin alter it manually without whatsoever practiced knowledge. At first, open up the spreadsheet, and hover your mouse over the line that divided ii columns. You should see a 2-manner arrow. In one case you become that, click and hold your mouse and drag towards the correct side.
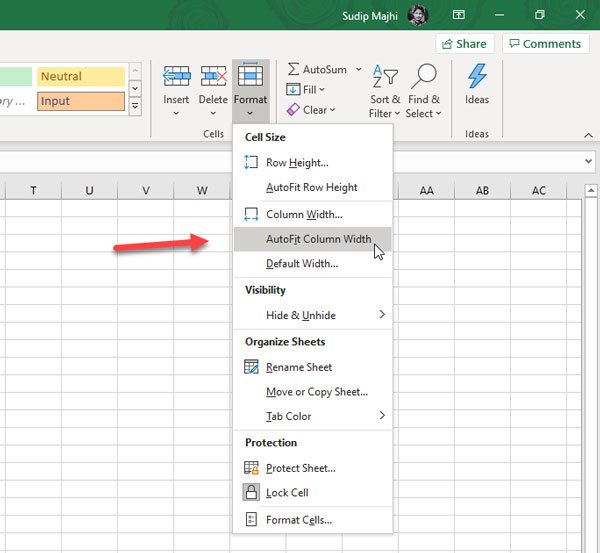
2] Use the AutoFit Column Width option
It is a handy option that lets you set the width of a column automatically. It detects the maximum width of a prison cell and applies that to the whole column. You do not need to employ the mouse-dragging method. The advantage of this trick is that you tin can increment the width of all columns at in one case. To get started, select all the columns that need to be changed, and click the Format carte, which should exist visible in the Home tab. After that, click on the AutoFit Column Width pick.
The width should be changed immediately.
iii] Change default width of prison cell/column
If y'all already know how much width you need precisely, you can change the default width of the cavalcade. For that, open the Format menu in Excel and select the Default Width choice. Now, yous need to choose a width.
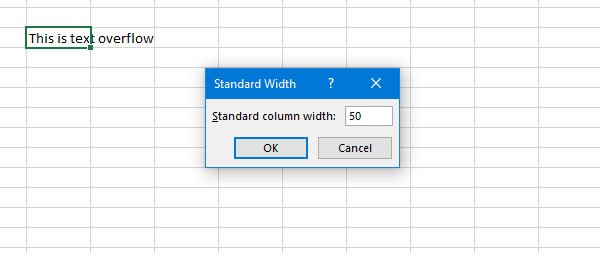
By default, information technology should bear the millimeter unit, which is the default unit of Excel. In case y'all changed it earlier, you need to set the width accordingly.
I hope this unproblematic tutorial volition assist you gear up the text-overflow event in Microsoft Excel.


Source: https://www.thewindowsclub.com/text-overflow-in-microsoft-excel
Posted by: pedersenalfic1991.blogspot.com
0 Response to "How To Hide Overflow Text In Excel"
Post a Comment